Playing and saving synthesized acoustic signals#
As the scope of pyLeTalker is to generate a set of signals, it is not furnished with a capability to play back the acoustic signals or save as a sound file.
most notably the radiated sound pressure signal or acoustic signal in short. Both lt.sim() and lt.sim_kinematic() functions return two objects: pout and res. The former is a length-N vector of the acoustic signal samples at the system sampling rate, which could be found as lt.fs. The N is the number of samples that you requested when calling lt.sim() or
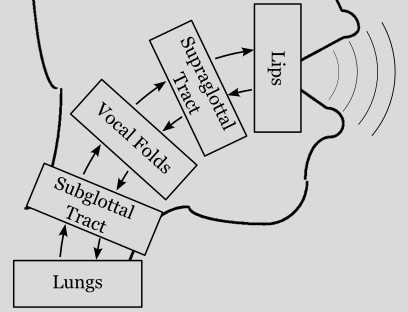
lt.sim_kinematic() function. The second output res is a dict of simulation results generated by each of 5 elements of the model: res['lungs'], res['trachea'], res['vocalfolds'], res['vocaltract'], and res['lips']. These Results objects host both the element configurations as well as recorded samples of their internal signals.
This example demonstrates how to plot the simulation outcomes using Matplotlib. If you are not familiar with Matplotlib, please follow their Getting Started Guide to install the library.
We start out by importing letalker and matplotlib. We use the shortened prefix (lt.) to access letalker library.
[1]:
import letalker as lt
Let’s reuse the example from the plotting example: a 1-second phonation of /a/ vowel with time-varying \(f_o\) using the kinematic model and lt.Interpolator.
[2]:
T = 1
N = round(T * lt.fs)

fo = lt.Interpolator([0, 0.3, 0.5, 0.8, 1.0], [100, 90, 85, 110, 120])
pout, _ = lt.sim_kinematic(N, fo, "aa")
Sound playback#
To listen to this acoustic signal in Jupyter Notebook, you can use the following code snippet using IPython.display.Audio which comes as a part of Jupyter Notebook.
[3]:
from IPython.display import Audio
Audio(data=pout, rate=lt.fs, normalize=True)
[3]:
If you wish to playback the audio in plain audio, you must use a third-party library such as simpleaudio.
Creating WAV files#
Saving the synthesized acoustic signals as audio files can be done with the SciPy library already installed to run pyLeTalker. The signal must first be normalized converted to 16-bit signed integer format, then saved
x = (pout*(32767/abs(pout).max())).astype('int16')

from scipy.io import wavfile
wavfile.write('my_vowel.wav', lt.fs, x)
Creating audio files of other formats#
If it is desirable to use compressed audio file format such as flac (lossless) or mp3, FFmpeg is recommended as a one-stop media solution. We have a sister Python project ffmpegio to make the process easier.
Installation#
You have FFmpeg already on the system, it needs to be on the system path. Otherwise, you may use the ffmpeg-downloader tool as follows:
pip install ffmpeg-downloader
ffdl install --add-path
This will download the latest FFMpeg version available to your OS and place it on the system path.
Now, to install ffmpegio
pip install ffmpegio
Saving audio file with FFmpegIO#
Save as a WAV file as done above but with FFmpegIO:
import ffmpegio as ff

ff.audio.write("my_vowel.wav", lt.fs, pout / abs(pout).max())
Unlike the above SciPy solution, you do not need to explicitly normalize to the maximum integer value. The signal just needs to be bounded within ±1.0.
FFmpeg automatically selects the audio format based on the filename extension. So, to use different format, simply specify the unique extension. For example:
import ffmpegio as ff

ff.audio.write("my_vowel.flac", lt.fs, pout / abs(pout).max())
ff.audio.write("my_vowel.mp3", lt.fs, pout / abs(pout).max())